- Who is Qubes OS For?
- How Does Qubes OS Work?
- General Usage
- Management Qubes
- When to Use Tails vs Qubes OS
- Getting Started
- How to Update
- How to Copy and Paste Text
- How to Copy and Move Files
- How to Shutdown Qubes
- How to Install Software
- How to Organize Your Qubes
- How to Use Disposables
- How to Use Devices (like USBs)
- How to Backup
- Whonix and Tor
- Password Management
- Windows Qubes
- Best Practices
- Post-installation Decisions
- Hardware Security
- OPSEC for Memory Use
- Remove Passwordless Root
- Wrapping Up
title="Qubes OS for Anarchists"
date=2023-04-07

[taxonomies]
categories = ["Defensive"]
tags = ["intro", "linux", "windows", "qubes", "intermediate"]

[extra]
blogimage="/images/qubes-os.png"
toc=true
Qubes OS is a security-oriented operating system (OS), meaning it is an operating system designed from the ground up to be more difficult to hack. This is achieved through compartmentalization, where each compartment is called a "qube" (using "virtual machines" — more on that below). All other Linux systems like Tails are monolithic, which means that if a hack succeeds anywhere on the system it can take over more easily. In Qubes OS, if one qube is compromised, the others remain safe. You can think of using Qubes OS as like having many different computers on your desk for different activities but with the convenience of a single physical machine, a single unified desktop environment, and a set of tools for using a number of different qubes together securely as parts of a unified system.
Qubes OS can be made to force all Internet connections through the Tor network (like Tails) by using Whonix, which is included by default. Devices (USBs, network devices, microphone and camera) are all strongly isolated and only allowed access when it is explicitly granted. "Disposables" are one-off qubes that self-destruct when shut down.
Who is Qubes OS For?
Given that anarchists are regularly targeted for hacking in the course of repressive investigations, Qubes OS is an excellent choice for us. AnarSec recommends Qubes OS for daily-use, and further down we compare when it is appropriate to use Tails vs. Qubes OS - both have unique strengths. Whereas Tails is so user-friendly that Linux knowledge isn't even required, Qubes OS is a bit more involved, yet it is still designed to be accessible to users like journalists who don't know Linux well.
Even if nothing directly incriminating is done on a computer that you use everyday, its compromise will still give investigators a field day for network mapping - knowing who you talk to and what you talk to them about, what projects you are involved in, what websites you read, etc. Most anarchists use their daily-use computer for some anarchist projects and communication with other comrades, so making our personal computers difficult to hack is a reasonable goal for all anarchists.
How Does Qubes OS Work?
Qubes OS is not quite another version of Linux. Rather, it is based on many "virtual machines" running Linux. All of these "virtual machines" are configured to work together in order to build a cohesive operating system.
What is a virtual machine? Virtualization is the process of running a virtual computer inside your computer. The virtual machine thinks it's a computer running on real hardware, but really it's running on abstracted hardware (software imitating hardware). Qubes OS uses a special program called a hypervisor to manage and run many of these virtual machines at once, on the same physical computer. To simplify things, virtual machines are referred to as qubes. Different operating systems like Debian, Whonix, Fedora, Windows, etc. can all run together simultaneously. The hypervisor strongly isolates each of the qubes from one another.

At the risk of overwhelming you, here is an overview of how Qubes OS is structured. You don't need to memorize any of this to actually use Qubes OS, it can just be helpful to understand the outline of the system before getting started. Each rectangle represents a qube (that is, a virtual machine). Let's break it down.
General Usage
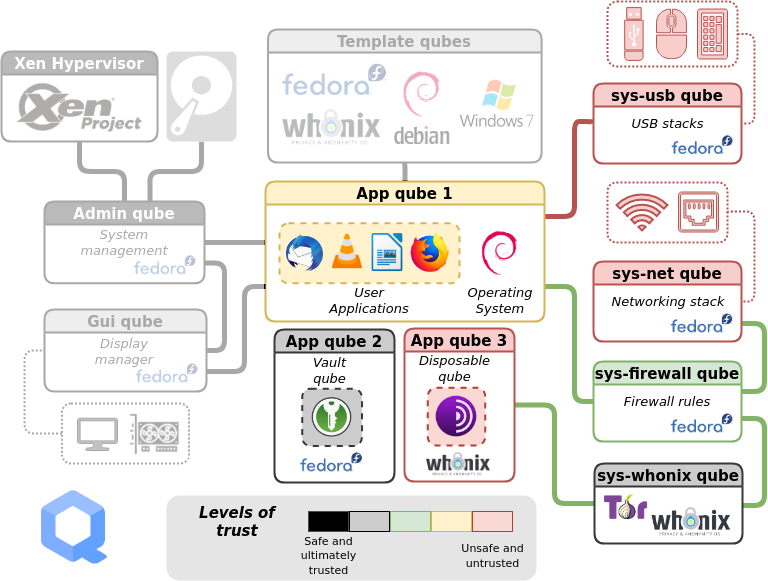
For now, ignore the greyed-out sections of the diagram. Daily use of Qubes OS primarily involves interaction with two components:
-
App qubes. There are three in this example. #1 is running the Debian operating system, #2 is running Fedora, and #3 is running Whonix. App qubes are where you run applications, store files, and do your work. You can have many isolated App qubes for different activities or purposes. Each App qube is like an entire self-contained operating system.
-
Service qubes. Sys qubes (as in system) connect to the Internet and devices. sys-usb manages attached USB devices, so that they are only attached to a qube with your consent. sys-net is similar to sys-usb, for network devices. sys-firewall is firewall control for all qubes connected to the Internet, and is in a separate qube so that if sys-net is compromised the firewall rules can't be trivially modified. Note that qubes never connect to sys-net directly, but always through sys-firewall. sys-whonix forces all network traffic through Tor, and itself connects to the firewall.
You'll notice that App qube #1 is connected to the Internet, App qube #2 is offline, while App qube #3 is connected to the Internet over Tor and is Disposable. Note that Whonix is actually two qubes: the workstation (App qube #3) and the gateway (sys-whonix). This has the security property that if the workstation is compromised, the gateway (where Tor is running) is not.
A Disposable qube is a type of App qube that self-destructs when its originating window closes. Note that while Tails exclusively uses memory (if the Persistent Storage feature is not enabled), Qubes OS uses the hard drive so forensic traces are still possible when using a Disposable.
Management Qubes

Two more components are necessary to complete the Qubes OS system:
-
Admin qube. This is the small, isolated and trusted qube that manages the other qubes. It is very protected because if it's compromised, it's game over. It uses a technology called Xen as the hypervisor. It is also named dom0, which is a Xen naming convention. The Admin qube has no network connectivity and is only used for running the desktop environment and window manager.
-
Template qubes. These are where applications and operating system files live. Templates are where you install and update software. Every App qube is based on a Template qube, but the Template is "read only" from the App qube's perspective. This means that the more sensitive system files are additionally protected from whatever happens in an App qube - they are not preserved between restarts of an App qube. Multiple App qubes can be based on a single Template, which has the convenient feature that updating a Template will provide updates to all App qubes based on this Template.
Another security feature of the Qubes OS structure is that the App qubes don't have direct access to the hardware - only the Admin qube can directly access the hard drive and only Service qubes can directly access the networking, USB, microphone and camera hardware.
When to Use Tails vs Qubes OS
Qubes includes Whonix by default for when you need to force all connections through Tor. As Privacy Guides compares (emphasis added):
Whonix is meant to run as two virtual machines: a “Workstation” and a Tor “Gateway.” All communications from the Workstation must go through the Tor gateway. This means that even if the Workstation is compromised by malware of some kind, the true IP address remains hidden.
Tails is great for counter forensics due to amnesia (meaning nothing is written to the disk); however, it is not a hardened distribution like Whonix. It lacks many anonymity and security features that Whonix has and gets updated much less often (only once every six weeks). A Tails system that is compromised by malware may potentially bypass the transparent proxy allowing for the user to be deanonymized.
Whonix virtual machines may be more leak-proof, however they are not amnesic, meaning data may be recovered from your storage device. By design, Tails is meant to completely reset itself after each reboot. Encrypted persistent storage can be configured to store some data between reboots.
For data to be recovered from a Qubes OS system, the Full Disk Encryption would still need to be successfully bypassed (such as by seizing the computer when it is turned on, or the use of a weak password). If the Tails Persistent Storage feature is in use, any data that is configured to persist faces the same issue.
Our recommendation is to use Qubes OS:
- As a daily-use computer
- For opening untrusted files or links. Many anarchist projects require this, such as website moderation, publications, etc.
- For tasks or workflows where Tails is too limiting or not applicable
And to use Tails:
- For writing and submitting communiques
- For action research
- For provisioning and connecting to hacking infrastructure
- For anything else where traces will land you in prison
- If the learning curve for Qubes OS is too steep
Getting Started
Qubes OS runs ideally on a laptop with a solid-state drive (SSD, which is faster than a hard disk drive, or HDD) and 16GB of RAM. A hardware compatibility list is maintained where you can see if a specific laptop model will work. If you want to install HEADS open-source firmware it has limited compatibility, so keep this in mind when you're buying your laptop—we recommend the ThinkPad X230 because the install is less involved than for other models. The X230 is also the only laptop model that is developer-tested, and is easily found in refurbished computer stores for around $200 USD. See the community-recommended computers list for several other options, and Best Practices for further discussion of hardware security.
The installation guide will get you up and running. Do not set up dual boot - an other OS could be used to compromise Qubes OS. If using the command line is above your head, ask a friend to walk you though it, or first learn command line basics and GPG (required during the verification stage) with Linux Essentials.
In the post-installation:
-
Tick the checkmark for Whonix qubes, as well as for updates to happen over Tor.
-
The post-installation gives the option of installing exclusively Debian or Fedora Templates (instead of both), as well as using the Debian Template for all sys qubes (the default is Fedora). Whether you opt to use Debian or Fedora for qubes that don't require Tor is your decision. Privacy Guides makes the argument that the Fedora software model (semi-rolling release) is more secure than the Debian software model (frozen), yet also recommends Kicksecure (which is based on Debian). See Best Practices for further discussion of this configuration choice.
-
Make sys-net disposable. If you will be using Wi-Fi instead of Ethernet, you will need to enter the Wi-Fi password again upon boot.
The Getting Started document is a good overview of most of what you need to know to begin. The Qubes documentation is very thorough, but difficult to orient to for a new user. We'll cover some basics here that aren't already mentioned in the Getting Started link.
How to Update
On Qubes OS, you should NOT be typing apt update or apt upgrade from the command line, which you may be used to from other experiences with Linux. As the docs specify, "these bypass built-in Qubes OS update security measures. Instead, we strongly recommend using the Qubes Update tool or its command-line equivalents." The first thing that you'll want to do after connecting to the Internet is to launch Qubes Update. From the docs:
you can [...] start the tool manually by selecting it in the Applications Menu under “Qubes Tools.” Even if no updates have been detected, you can use this tool to check for updates manually at any time by selecting “Enable updates for qubes without known available updates,” then selecting all desired items from the list and clicking “Next.”
Updates will take a moment to be detected on a new system, so select "Enable updates...", tick all qubes, and press Next. A Whonix window might pop up prompting you to do a command line update, but this can be ignored as it will be resolved by the update. Once Qubes Update is done, reboot.
How to Copy and Paste Text
Qubes has a special global clipboard to allow you to copy and paste text between qubes.
- Press Ctrl+C to copy text as normal to the internal clipboard of the source App qube.
- Press Ctrl+Shift+C to transfer the contents of the source App qube's internal clipboard to the global clipboard.
- Press Ctrl+Shift+V in the destination App qube to transfer the contents of the global clipboard to the destination App qube's internal clipboard.
- Press Ctrl+V to paste text as normal from the internal clipboard of the destination App qube.
It's a little tricky at first, but you'll get the hang of it fast!
How to Copy and Move Files
A special tool exists for moving files and directories (folders) between qubes that requires explicit user consent. As a rule of thumb, only move files from more trusted qubes to less trusted ones.
From the docs:
Open a file manager in the qube containing the file you wish to copy (the source qube), right-click on the file you wish to copy or move, and select Copy to Other AppVM... or Move to Other AppVM....
A dialog box will appear in dom0 asking for the name of the target qube (qube B). Enter or select the desired destination qube name.
If the target qube is not already running, it will be started automatically, and the file will be copied there. It will show up in this directory (which will automatically be created if it does not already exist):
/home/user/QubesIncoming/<source_qube>/<filename>. If you selected Move rather than Copy, the original file in the source qube will be deleted. (Moving a file is equivalent to copying the file, then deleting the original.)If you wish, you may now move the file in the target qube to a different directory and delete the /home/user/QubesIncoming/ directory when no longer needed.


How to Shutdown Qubes

Click on the Domains widget to see which Qubes are currently running, as well as how much memory (RAM) and computing power (CPU) they are using. Each qube uses memory, so when you are done with a qube you should shut it down to free up the memory it is using. Closing windows is not enough - you need to shut each qube down manually when it's no longer needed.

How to Install Software
While Tails has a Graphical User Interface for installing any additional software, at this time Qubes OS does not, so new software must be installed from the command line. If unfamilar with either the command line or how software works in Linux, check out Linux Essentials to get acquainted. For choosing what additional software to install, keep in mind that an application being open-source is an essential criteria, but is insufficient to be considered secure. The list of included software for Tails will cover many of your needs with reputable choices.
Software is installed into Templates, which have network access only for their package manager (apt or dnf). Installing a package requires knowing its name, and all can be browsed through a web browser for Debian as well as Fedora, or on the command line.
It is best not to install additional software into the default Template, but rather to install the software into a cloned Template, in order to not unnecessarily increase the attack surface of all App qubes based on the default Template. For example, to install packages for working with documents which are not included by default in debian-11, I clone it first. Go to Applications menu > Qubes Tools > Qube Manager. Right-click debian-11 and select "Clone qube". Name the new Template debian-11-documents.
To install new software, as the docs detail:
Start the template.
Start a terminal.
Install software as normally instructed inside that operating system, e.g.:
- Fedora:
sudo dnf install <PACKAGE_NAME>- Debian:
sudo apt install <PACKAGE_NAME>
Shut down the template.
Restart all qubes based on the template.
(Recommended) In the relevant qubes’ Settings > Applications tab, select the new application(s) from the list, and press OK. These new shortcuts will appear in the Applications Menu. (If you encounter problems, see here for troubleshooting.)

Remember, you should not be running apt update or dnf update.
To return to the example above, I would start a terminal in the debian-11-documents Template which I had just cloned, and run sudo apt install libreoffice-writer mat2 bookletimposer gimp gocryptfs. Once the install completes, I shut down the Template. I could then create or assign a qube to use this Template, and use LibreOffice, etc. Installing software should be the only time that most users need to use the command line with Qubes OS.
You may want to use software that is not present in the Debian/Fedora repositories, which makes matters a bit more complicated and also poses a security risk - you must independently assess whether the source is trustworthy, instead of relying on Debian or Fedora. Linux software can be packaged in several ways: deb files (Debian), rpm files (Fedora), AppImages, Snaps and Flatpaks. A forum post lays out your options. If the software is available at Flathub but not in the Debian/Fedora repositories (such as Signal Desktop), we recommend Qube Apps.
How to Organize Your Qubes
The next step is to decide how to organize your system - there is much more flexibility in this regard than in a monolithic system like Tails. In general, you should try to use disposables to connect to the Internet whenever possible. Here is our recommended set-up for the typical user, which can be futher extended as needed.
After installation, a number of qubes already exist. Click on the Applications Menu to see all of them. We will delete the following default App qubes because they use the Internet without being disposable: work, personal, and untrusted. Go to Applications menu > Qubes Tools > Qube Manager. Right-click and select "Delete qube" for each.
How the App qubes will be organized, without displaying service qubes or Templates:

-
A vault qube. This will be used for all data storage, because a qube that doesn't need networking shouldn't have it. This qube can be reassigned to the
debian-11-documentsTemplate so that trusted files can be opened there. -
A disposable Whonix qube. The default
whonix-ws-16-dvmqube is disposable (noted by the "dvm" naming, meaning disposable virtual machine). You can think of it as similar to Tails: system-wide Tor, and erasure after shutdown (without the anti-forensics property, as noted above). All Whonix App qubes use thewhonix-ws(workstation) Template and only thesys-whonixqube uses thewhonix-gw(gateway) Template. -
A disposable Debian or Fedora qube. The default
debian/fedora-dvmqube (depending on your post-installation decision) is disposable, and is great for web browsing that blocks Tor, such as logging into online banking.
It's possible to just use the system as it is now, but let's show you how to create an App qube and a disposable.
-
A Monero qube. Lets say you want to use the Monero wallet for an anarchist project. We'll create a new qube to compartmentalize that activity. Go to Applications menu > Qubes Tools > Create Qubes VM
- Name: Project-monero
- Color: Yellow
- Type: AppVM
- Template: whonix-ws-16
- Networking: sys-whonix
- The official Monero wallet is natively included in whonix-ws. Now that the qube exists, in the Settings > Applications tab, bring Monero Wallet into the Selected column, and press OK. The shortcut will now appear in the Applications Menu.
-
An offline disposable qube. Right now both disposables have networking (with and without Tor). Finally, we will demonstrate how to create a disposable without networking for opening untrusted files (like PDFs and LibreOffice documents). Again, go to Applications menu > Qubes Tools > Create Qubes VM
- Name: debian-11-offline-dvm
- Color: Black
- Type: AppVM
- Template: debian-11-documents
- Networking: none
- You could equally use Fedora. In the new qubes' Settings > Advanced tab, under "Other" tick "Disposable Template", then press OK. You will now see the offline disposable present at the top of the Applications Menu - make sure to work in the disposable, and not the disposable Template.
- Go to Applications menu > Qubes Tools > Qubes Global Settings. Set the default disposable Template to
debian-11-offline-dvm - Now, if a malicious document achieves code execution after being opened, it will be in an empty Qube that has no network, and which is destroyed upon being exited.
Qubes Task Manager is a Graphical User Interface to configure qubes that otherwise require advanced command line use to set up. Available configurations include:
- Split-gpg: GPG keys live in an offline qube and their access is tightly controlled
- Split-ssh: SSH keys live in an offline qube and their access is tightly controlled
- Mullvad-vpn: A VPN qube using the WireGuard protocol (via Mullvad). Mullvad is one of the only reputable VPN companies - they accept cryptocurrency, and also sell voucher cards.
- sys-vpn: A VPN qube using the OpenVPN protocol
If you want your qubes that are not using Tor to be forced through a VPN, this is the easiest way to set that up.
By default, App qubes only have 2 GB of private storage. This small amount will fill up quickly - if an App qube is close to filling up, the Disk Space Monitor widget will have a notification. To increase the private storage size of any given qube, in the qubes' Settings > Basic tab, change "Private storage max size". This storage won't be used immediately, it is just the max that can be used by that qube.
How to Use Disposables
Disposables can be launched from the Applications menu; the disposable will be at the top, and the disposable Template near the bottom. For example, to use a disposable Tor Browser, go to Application Menu > Disposable: whonix-16-ws-dvm > Tor Browser. This is how you do all Tor browsing. If you launch a disposable application, but then want to access the file manager for the same disposable qube, this can be accomplished from the Qubes Domains widget, in the top-right corner of the interface. If you were to simply select "Files" from the Applications menu, this would start yet another disposable.
Once you close all windows of a disposable, the whole disposable shuts down and is destroyed. The next time that it boots, the disposable will completely reflect the state of its Template. In contrast, an App qube needs to be shut down manually (using the Qubes Domains widget), and will persist data in the /home, /usr/local and /rw/config directory. The next time that it boots, all locations in the file system of an App qube other than these three directories will reflect the state of its Template. Take a look at how inheritance and persistence works for Templates, App qubes, and disposables for more information.

In the file manager of an App qube, right-clicking on certain types of files will give the option Edit In DisposableVM and View In DisposableVM. This is exactly how we want to open any untrusted files stored in our vault qube. It will use the default disposable that we set earlier, which is offline. Once you close the viewing application the whole disposable will be destroyed. If you have edited the file and saved the changes, the changed file will be saved back to the original app qube, overwriting the original. By contrast, viewing in a disposable is read-only, so if the file executes something malicious, it can't write to the App qube you launched it from - this is preferred for files you don't need to edit.
If your file is opening in a different application than what you require, you'll need to change the disposable Template default:
- Send a file of this type to your disposable Template (in our case,
debian-11-offline-dvm). - Open the file manager for the disposable Template.
- Select the file, right-click Properties.
- In the Open With tab, select your preferred application for this file type.
- Press Set as default.
- Delete the file from the disposable Template (don't forget to empty the trash).
- Shut down the disposable Template for the change to take effect.
For PDF files, right-clicking will also give the option Convert To Trusted PDF. This will sanitize the PDF file so that it can go from being untrusted to trusted. This is achieved by it being converted into images in a disposable, and cleaning the metadata.
Particular types of files in an App qube can be set to be opened in a disposable by default. However, if I set PDF files to always open in a disposable, this is not failsafe - some files may end in .pdf but in reality be something else. This guide sets all file types to open in a disposable to mitigate this possibility. If you'd nonetheless like to open only PDF files in a disposable, right-click a PDF and select Open With Other Application > qvm-open-in-dvm.
How to Use Devices (like USBs)
To learn how to attach devices, we will format the empty USB or hard drive you will be using for backups. The USB will be attached to an offline disposable to mitigate against BadUSB attacks.
- Go to Applications menu > Disposable: debian-11-offline-dvm > Disks. The disposable will have a name with a random number like disp4653. If Disks is not present, make the change on the Settings > Applications tab.

The Qubes Devices widget icon
-
The Qubes Devices widget is used to attach a USB drive (or just its partitions) to any qube easily. Simply click on the widget and plug in your USB drive. The new entry will be under "Data (Block) Devices", typically
sys-usb:sdais the one you want (sda1is a partition and would need to be mounted manually). Hover over the entry, and attach it to the disposable you just started (in the case of the example I gave above, disp4653). -
The empty USB or hard drive should now be displayed in the Disks application. Format the empty device and then create a new encrypted partition, like you would in Tails. You can use the same LUKS password as is used for your Qubes OS LUKS, because you will need to memorize it to restore from backup, and it will contain the same data.
-
Before removing the USB drive, first eject it using the Qubes Devices widget, which ejects it from the qube. Then go to Applications menu > sys-usb > Files, and select "Safely Remove Drive" to eject it from the computer.
There are command line instructions for using an external keyboard or mouse. Webcams and microphones are considered devices, and must be attached to an App qube in order to use them.
You don't always need to attach a USB drive to another qube with the Qubes Devices widget - it will also be accessible from sys-usb directly, through the File Manager. You can copy specific files between the USB and another App qube without needing to attach the USB controller to the App qube. After the USB is ejected, restart sys-usb - since it's disposable, it does the job of sanitizing for another device.
How to Backup
As soon as your qubes are organized in the way that you would like, backup your system. Depending on your needs, we recommend making a weekly backup - pick a day of the week and add a reminder on your calendar. We also recommend making a redundant backup which is stored off-site and is synchronized monthly (to protect against data loss from a house raid).
Adapted from the docs:
Go to Applications menu > Qubes Tools > Backup Qubes.
Move the VMs that you want to back up to the right-hand Selected column. VMs in the left-hand Available column will not be backed up. You may choose whether to compress backups by checking or unchecking the Compress the backup box. Compressed backups will be smaller but take more time to create. Once you have selected all desired VMs, click Next.
Go to Applications menu > Disposable: debian-11-offline-dvm > Files to start a file manager in an offline disposable. Plug in the LUKS USB or hard drive you will be backing up to and attach it (see above for instructions on creating and attaching this drive). The drive should now be displayed at + Other Locations in the file manager. Mount the LUKS partition by entering your password. Create a new directory in it called
backups.In Backup Qubes, select the destination for the backup:
- Target qube: select the disposable, named something like disp1217.
- Backup directory: click ... to select the newly created folder
backups.
- Set an encryption passphrase, which can be the same as your Qubes OS user passphrase, because you will need to memorize it to restore from backup, and it will contain the same data. This is dom0, so you won't be able to paste it from a password manager.
- Untick "Save settings as default backup profile", and press Next.
- Once the backup is complete, test restore your backup. Go to Applications menu > Qubes Tools > Restore Backup. DO NOT FORGET to select Test restore to verify backup integrity (no data actually restored). A test restore is optional but strongly recommended. A backup is useless if you can’t restore your data from it, and you can’t be sure that your backup is not corrupted until you try to restore.
Whonix and Tor
The Whonix project has their own extensive documentation. When Whonix is used in Qubes OS it is sometimes referred to as Qubes-Whonix. Whonix can be used on other operating systems as well, but it's preferable to use it on Qubes OS due to the superior isolation it provides.
Different applications on a Whonix App qube are configured to use unique circuits of the Tor network so that their activity cannot be correlated - this is called Stream Isolation.
Note that multiple Whonix App qubes should not be used simultaneously:
It is safest to only use one Whonix-Workstation at a time and for a single activity. New risks are introduced by running multiple Whonix-Workstation at the same time. For instance, if a single Whonix-Workstation was compromised, it could potentially perform various side channel attacks to learn about running processes in other VMs, and not all of these can be defeated. Depending on user activities, a skilled adversary might be able to correlate multiple Whonix-Workstations to the same pseudonym.
Also worth noting is that "for those who regularly download Internet files, Tor Browser's default download folder is inconvenient." Follow the docs to change the default in the whonix-ws (workstation) Template.
Tor Browser can't upload files from /home/user/QubesIncoming/ due to how permissions are set, so move files somewhere in /home/user/ to upload them, such as the Downloads directory.
Password Management
Passwords should be managed with KeePassXC from the vault App qube. If unfamiliar with KeePassXC, you can learn about it in Tails for Anarchists. This leaves three passwords that must be memorized:
- LUKS password (first boot password)
- User password (second boot password)
- KeePassXC password
For advice on password quality, see Tails Best Practices.
Windows Qubes
It is possible to have Windows qubes, though the installation is a bit involved. This allows programs that are not available for Linux, such as the Adobe Creative Suite programs, to be used from Qubes OS (ideally offline). Installing "cracked" software downloaded from a torrent is not recommended as these are often malicious. The Adobe Creative Suite can be downloaded from Adobe, and then cracked with GenP.
Best Practices
There is a lot more flexibility in how you configure Qubes OS than Tails, but most of the Tails best practices still apply. To summarize, in the order of the Tails article:
- Protecting your identity
- Still clean metadata from files before sharing them.
- Compartmentalization is baked into Qubes OS; instead of restarting Tails, use a dedicated qube.
- Limitations of the Tor network
- For sensitive activity, don't use Internet connections that could deanonymize you, and prioritize .onion links when available.
- If you might be a target for physical surveillance, consider doing surveillance detection and anti-surveillance prior to heading to a cafe. Alternatively, use a Wi-Fi antenna from indoors.
- Reducing risks when using untrusted computers
- The verification stage of the Qubes OS installation is equivalent to GnuPG verification of Tails.
- Only attach USBs and external drives to a qube that is disposable and offline.
- To mitigate against physical attacks to the computer, buy a dedicated laptop from a refurbished store, make it tamper-evident and store it in a tamper-evident safe.
- To mitigate against remote attacks to the computer, you can use anonymous Wi-Fi, and replace the BIOS with HEADS. It's not possible to remove the hard drive, and Qubes OS already isolates the Bluetooth interface, camera and microphone. USBs with secure firmware are less important thanks to the isolation that sys-usb provides, and a USB with a physical write-protect switch is unnecessary because the operating system files are stored on the hard drive (and App qubes don't have write access to their templates).
- Encryption
- Passwords: See above
- Encrypted containers: Gocryptfs works the same way, and is useful for a second layer of defence.
- Encrypted communication: for synchronous messaging, use Cwtch, and for asynchronous messaging use Element. See Encrypted Messaging for Anarchists.
- Phishing awareness
- This is where Qubes OS really shines. Awareness is no longer your only defence - the design of Qubes OS protects against phishing attacks.
- Open attachments in a qube that is disposable and offline.
- Open links in a Whonix qube that is disposable.
Post-installation Decisions
During the post-installation of Qubes OS, you have the option of installing exclusively Debian or Fedora Templates (instead of both). You also have the option of using the Debian Template for all sys qubes (the default is Fedora). Our recommendation is to install only Debian Templates, and to convert them to Kicksecure. This way, every App qube on your system will either be Whonix or Kicksecure - Kicksecure is significantly more hardened than either Debian or Fedora.
Kicksecure is not currently available as a Template. To get the Kicksecure Template you will clone the Debian Template - follow the Kicksecure docs for distribution morphing on Qubes OS. App qubes that require Internet access without Tor can now use the Kicksecure template instead of the Debian Template. We recommend to use disposable qubes whenever possible when connecting to the Internet. To create a Kicksecure disposable:
- Go to Applications menu > Qubes Tools > Create Qubes VM
- Name: kicksecure-16-dvm
- Color: purple
- Type: AppVM
- Template: kicksecure-16
- Networking: default (sys-firewall)
- In the new qubes' Settings > Advanced tab, under "Other" tick "Disposable Template", then press OK. You will now see the disposable present at the top of the Applications Menu - make sure to work in the disposable, and not the disposable Template.
Kicksecure is considered untested for sys qubes. If during the Qubes OS installation, you set all sys qubes to use the Debian Template, and set sys qubes to be disposable, the Template for sys-net, sys-firewall, and sys-usb will be debian-11-dvm. If you want to use disposable Kicksecure for sys qubes:
- Set
sys-net,sys-firewall, andsys-usbto use thekicksecure-16-dvmTemplate.
Hardware Security
Hardware security is a nuanced subject, with three prominent factors at play for a Qubes OS computer:
-
Root of trust: A secure element to store secrets that can be used as a root of trust during the boot process.
-
Blobs: Newer hardware comes with binary blobs which require trusting corporations to do the right thing, while some older hardware is available without binary blobs.
-
Microcode updates: Newer hardware gets microcode updates to the CPU which (ideally) address security vulnerabilities as they are discovered, while older hardware doesn't after it is considered End Of Life. The Heads threat model page explains why CPU vulnerabilities matter:
"With the disclosure of the Spectre and Meltdown vulnerabilities in January 2018, it became apparent that most processors manufactured since the late 1990s can potentially be compromised by attacks made possible because of transient execution CPU vulnerabilities. [...] Future not-yet-identified vulnerabilities of this kind is likely. For users of Qubes OS, this class of vulnerabilities can additionally compromise the enforced isolation of virtual machines, and it is prudent to take the risks associated with these vulnerabilities into account when deciding on a platform on which to run Heads and Qubes OS."
Of the community-recommended computers, the ThinkPad X230 and the ThinkPad T430 strike a relatively unique balance, because they both use the Ivy generation of CPUs and they are both compatible with Heads:
- Root of trust: Heads uses the Trusted Platform Module (TPM) to store secrets during the boot process - the Thinkpad X230 and T430 have TPM v1.1.
- Blobs: No binary blobs are present on these models after Heads is installed, with the exception of the Intel Management Engine (which can be "neutered") and the ethernet blob (which can be generated).
- Microcode updates: Spectre and Meltdown are mitigated by microcode updates for this CPU generation which are installed by default on Qubes OS. Newer hardware uses CPUs with other extensions that are vulnerable to new attack vectors - the Ivy generation is unimpacted by these.
Qubes OS also applies proper software mitigation to this class of attacks at the level of the hypervisor, including disabling HyperThreading.
OPSEC for Memory Use
To address "future not-yet-identified vulnerabilities of this kind" on older hardware that is no longer receiving microcode updates, the OPSEC suggestion is to limit the presence of secrets in memory that could result in leaks. Every qube that is running is using memory, and a compromised qube could use such vulnerabilities to read from the memory of other qubes. Disposables will be reset after being shutdown, so we can assume that their compromise would likely be transient. Perform sensitive operations in qubes with no networking, and shutdown secure qubes when not in use. Pay attention to which qubes are running simultaneously:
- vault qube: Do not run with an unlocked KeePassXC database at the same time as a highly-untrusted qube.
- sys-usb: Disposable. Only run when needed, and shutdown when finished.
- sys-net: Disposable. Only run when needed, and shutdown when finished. Shutdown when performing sensitive operations in other qubes, as far as possible. Restart before activities which require sys-net (i.e. email, ssh sessions, etc.).
Remove Passwordless Root
By default, Qubes OS does not require a password for root permissions (in other words, you can run a command with sudo without a password). The docs explain the rationale for this decision. In alignment with the security principle of defense-in-depth, we recommend enabling a password for root permissions. Forcing an adversary to successfully execute privilege escalation can be a mitigating factor, considering the hardening of Kicksecure/Whonix Templates as well as the limited time window provided by disposables.
If you are comfortable with the command line, follow the docs for replacing passwordless root access with a Dom0 user prompt in Debian/Whonix/Kicksecure Templates.
Wrapping Up
The documentation has several troubleshooting entries, and the forum is generally very helpful. We recommend starting to use Qubes OS gradually, where you can progressively do tasks on Qubes OS instead of your previous operating system, because trying to learn everything at once may be overwhelming.